Quantcast
Channel: OpenEnergyMonitor aggregator
Viewing all 328 articles
Browse latest View live

mharizanov: WiFi Thermostat with weekly scheduler

$
0
0

The WiFi SSR board project changed a bit and I use classical relays instead of SSRs now. The reason is that SSRs tend to get quite hot when switching larger loads, and the 8A relays I last used actually could be used for max 2.5A load switching with no heat sink. The high quality relays I now use allow 10A load switching and are rather quiet. I also changed the design a bit so that it would fit in a box (DIN rail compatible) for increased safety.

The board now looks like this: (this particular project needs only one relay):IMG_20150227_090253~2[1]


As additional feature, I’ve added thermostat function based on Trystan Lea’s Open Thermostat Scheduler, only my code runs entirely off the ESP8266 SoC. The UI is touch-friendly and works great on mobile devices:

control-thermostat-html2


I’ve also added broadcasting functionality, allowing the board to send its state to third party services like emoncms.org and thingspeak.com. The benefit of this is that the board can now fetch historical readings from the services and render some fancy charts for further business intelligence:

control-thingspeak-html


The first board went into use for a radiator thermostat project for a downtown place I use as office. The building has central heating and the radiators had manual actuators. I replaced these with a Swiss made thermoelectric actuator that is controlled by the relay and set a heating schedule for it:

WiFi thermostat with one relayHERZ thermoelectric actuatorMy setup

I have it running for a week now and am loving the convenience and ability to remotely control the temperature.

The same approach could be used to start heater element in a boiler for example.

I plan to blog about location based switching using owntracks, MQTTand the WiFi thermostat sometime soon.

I’ve set up a WiKi for the project in preparation to having few for sale sometime mid-March 2015.

Some more pictures:

The board in the boxesp8266 board firmware update modeRelay board less relays PSU, PSU fuse and screw terminalsindex-tplconfig-mqtt-tplconfig-broadcastd-tplconfig-ntp-tplconfig-relay-tplconfig-sensor-tplabout-tplconfig-wifi-wifi-tplBoard SchematicBoard Layout Design

  (319)


JeeLabs: Micro Power Snitch, part 3

$
0
0

There’s trouble ahead for the MPS: it’s not reliable enough yet, and can enter a “zombie mode” whereby the µC won’t have enough voltage to start up, while drawing so much current (relatively speaking) that the energy source isn’t able to raise the voltage further.

Leading to some beautiful pictures, but nevertheless totally undesired behaviour:

SCR05

The daily articles in this week’s episode are:

So far, it looks like this second MPS design solves the problems of the first. Progress!

(For comments, visit the forum area)

mharizanov: Making IFTTT (If This Then That) talk to Node-RED

$
0
0

IFTTT (short for “If This Then That”) is a popular service which lets you trigger actions based on certain events that occur around the Internet. It is missing an important functionality (IMHO), namely WebHooks. A WebHook is an HTTP callback: an HTTP POST that occurs when something happens; a simple event-notification via HTTP POST. I explain this missing functionality with their business model as they make money from the vendors that want their products connected there. Such functionality has been requested for ages now, but won’t be made available anytime soon, in my view.

There is a nice work-around though (shhh), a webhook middleware for the IFTTT service, made possible by simulating a WordPress blog channel. IFTTT uses wordpress-xmlrpc to communicate with the WordPress blog. It presents a fake-xmlrpc interface on the web address, which causes IFTTT to be fooled into thinking of this as a genuine WordPress blog. The only action that IFTTT allows for WordPress is posting, which is used for powering WebHooks. All the other fields (title, categories) are passed along by the WebHook.

I’ve set up my WordPress channel and couple IFTTT recipes to try it out:wordpress ifttt


The recipe is set as follows, below is an example of geofencing via the “Android location” channel, but it could be any other IFTTT channel as long as you supply unique identifier in the ‘category’ property so that Node-RED can parse it out:

wordpress ifttt recipe


The recipe basically says that if I enter or leave the outlined area, IFTTT should make a HTTP POST to my home automation system running Node-RED. That could be even simpler, for example making a HTTP API POST to switch on / off my WiFi connected relay board for example, but lets make it more fancy.

The real world is more complex than “If This Then That” and this is the weakest point of IFTTT. Without some scripting and more complex conditions, it is just an eye-candy service for newbies. For example, I’d like to switch Internet connected thermostat on or off based on my and wifey’s location. If both of us aren’t at home (more than 1 km away), we could decrease room thermostats by couple degrees; Upon re-entering the geo fenced area, the thermostats could be turned up. If both of us are more than 50km away from home, thermostats and heating/cooling can be switched off completely. This sort of conditions can only be triggered by more complex logic, and this is where Node-RED comes in.

Below is a Node-RED template that captures incoming IFTTT posts, routes them based on recipe’s  ‘category’ property and acts upon the geofencing event (entry/exit):

wordpress ifttt node-red

[{"id":"1bcd1a89.e432e5","type":"http in","name":"","url":"/iftt","method":"post","x":138,"y":194,"z":"289137bb.d76ec8","wires":[["b3f11a1.f4c0ee8","b038baf8.4fc748","1628045a.e9d7fc"]]},{"id":"b3f11a1.f4c0ee8","type":"http response","name":"","x":316,"y":181,"z":"289137bb.d76ec8","wires":[]},{"id":"1628045a.e9d7fc","type":"switch","name":"Route by event type","property":"payload.categories","rules":[{"t":"eq","v":"area"}],"checkall":"true","outputs":1,"x":329,"y":244,"z":"289137bb.d76ec8","wires":[["5ebd113c.a142f"]]},{"id":"b038baf8.4fc748","type":"debug","name":"","active":true,"console":"false","complete":"false","x":610,"y":146,"z":"289137bb.d76ec8","wires":[]},{"id":"2a05b045.d5fa5","type":"comment","name":"Capture IFTTT HTTP post","info":"","x":189,"y":77,"z":"289137bb.d76ec8","wires":[]},{"id":"5ebd113c.a142f","type":"function","name":"Breakdown location change payload","func":"var tmp=msg.payload.title.split(\"|\");\nmsg.action=tmp[0];\nmsg.occuredat=tmp[1];\nreturn msg;","outputs":"1","valid":true,"x":385,"y":299,"z":"289137bb.d76ec8","wires":[["1e9f59f1.e160a6","b038baf8.4fc748"]]},{"id":"1e9f59f1.e160a6","type":"switch","name":"","property":"action","rules":[{"t":"eq","v":"entered"},{"t":"eq","v":"exited"}],"checkall":"true","outputs":2,"x":296,"y":355,"z":"289137bb.d76ec8","wires":[["9c9c8908.636378"],["c2a8da6c.3d5728"]]},{"id":"c2a8da6c.3d5728","type":"function","name":"Act upon area exit","func":"msg.url=\"http://*****/control/relay.cgi?relay1=0\"\nreturn msg;","outputs":1,"valid":true,"x":483,"y":425,"z":"289137bb.d76ec8","wires":[["28952f7e.d76ad"]]},{"id":"9c9c8908.636378","type":"function","name":"Act upon area entry","func":"msg.url=\"http://*****/control/relay.cgi?relay1=1\"\nreturn msg;","outputs":1,"valid":true,"x":489,"y":360,"z":"289137bb.d76ec8","wires":[["28952f7e.d76ad"]]},{"id":"28952f7e.d76ad","type":"http request","name":"Make HTTP API request","method":"GET","ret":"txt","url":"http://","x":727,"y":384,"z":"289137bb.d76ec8","wires":[[]]}]

The flow can be extended to act upon different incoming triggers, those need to be set in the ‘category’ property so it can differentiate and apply different rules.

In conclusion, while I am  mostly negative about IFTTT, it can be used to easily interface with other connected things. (521)

JeeLabs: Micro Power Snitch, part 4

$
0
0

At the end of the day, the Micro Power Snitch (MPS) is really about powering up and down robustly under all circumstances. There will be times when there is no energy coming from the Current Transformer, and there will be times when energy levels hover around the go/no-go point of the circuit. That’s the hard part: being (very) decisive at all times!

This week’s episode looks at an improved circuit with a dozen individual components or so. As you will see, it has excellent snap-action behaviour, and does the right thing on the “up” ramp as well as on the “down” ramp, regardless of how slowly those voltage levels change.

DSC 4958  Version 2

Here is the daily sequence for this week:

With a complete MPS circuit design worked out, we’re finally getting somewhere.

(For comments, visit the forum area)

Nathan Chantrell.net: ESP8266 ESP-03 Dev Board

$
0
0

esp-03_boardThis is a small dev board I designed to make experimenting with and deploying the ESP8266 ESP-03 modules a bit easier. As well as breaking out all the pins to 2.54mm headers it has a position to fit either a DS18B20 temperature sensor or a DHT22 temperature/humidity sensor plus the required pull up resistor. It can be powered from 3.3V or 5V+* if the regulator is fitted and there is a footprint for a micro USB connector if required.

*The regulator I used is good for up to 18V but I don’t know how far you would be able to push it with only the small area of PCB that is used as a heatsink. I would imagine it will be OK to at least 9V.

A 3 way pin header allows a jumper to be moved to switch between normal running mode and flash programming mode. With the jumper in the RUN position GPIO0 is connected to the header marked 0 and in the PRG position GPIO0 is grounded. It needs to be powered up with the jumper in the PRG position to enable programming mode.

ESP-03_SleepSide note: to use the deep sleep function of the ESP8266 you must link two pads on the ESP-03 module itself, the ones near VCC and GPIO14 (see picture on left). This joins GPIO16 to RST on the chip so it can be woken up automatically, this is the only way to do it with the ESP-03 as RST isn’t broken out on the module.

As with all my boards this is open source so if you want to get some made or remix it you will find all the files below. If you want to order some of the PCBs you can either send the gerber files off to your fab of choice or just order them from DirtyPCBs.com here. Cost is $14 for 10 boards including delivery. Don’t be put off by the name, there is nothing dirty about them, they are at least as good as boards I’ve had from Seeed in the past.

esp-03_board_brdDownloads

BOM
3 way pin header and jumper for programming
Plus 2.54mm headers as required

Optional parts required for 5V+ regulation:

3.3V LDO regulator in SOT-223 package, I used an NCP1117LP

Optional:

R1: 4.7K 0805 Resistor (for DS18B20) or 10K 0805 resistor (for DHT22)

I used paste and hot air to solder the passives, regulator and micro usb and hand soldered the rest including the ESP-03 module.


Open Source HardwareThis is Open Source Hardware licenced under a
Creative Commons Attribution-ShareAlike 3.0 Unported (CC BY-SA 3.0) licence.


mharizanov: DIY Internet connected smart humidifier

$
0
0

I worked on creating a Internet connected humidistat last week using my open source WiFi relay project as platform. We observe quite dry air at our house, I suspect this is due to the fact that we use fan coils for heating/cooling. Humidity levels at home are usually below the 30% mark, which poses a health risk along with uncomfortably dry air. I’ve found these interesting charts that got me convinced I need to do something:

healthy-moisture-rangeLow humidity helps spread virus/bacteria over air.

The comfortable zone for humans depends on the temperature, here is what it looks like for most of us:

1204-Comfort-300x244


We own a ultrasonic humidifier, but it has no setpoint, just on/off with intensity setting. Also, I’d like it to work only in certain times, not all of the time, so that called for using the WiFi thermostat scheduling function, only re-worked to take the humidity as to determine on/off state rather than temperature:

The control UI on my phoneClose up of the control UI

I realize there are homes with exact opposite problem, i.e. humidity is too high. For that reason I have a “Dry” function to use with  air drier as well so the relay will function using opposite logic i.e. activate when humidity is exceeded.


The project uses a DHT22 temperature sensor mounted to the side of the enclosure for better ventilation and reliable reading:

IMG_20150307_164036~2


I threw in a ultra-cheap I2C OLED status display to get a visual reading. Milling the box so that the OLED shows was pretty nasty, hated it. I cut a piece of paper and placed it on top of the cover, below the transparent lid to cover up for the lousy milling job:

With box cover onThe wiring inside..

The humidistat switches on and off the humidifier as needed, the humidifier itself is plugged in to a plug in the relay. The humidifier auto detects when water is out and stops, so I didn’t have to care about that.

Humidifier plugged in the relayUltrasonic Humidifier

Last I attached an external antenna, not that I needed it for this particular project, but just wanted to test the range improvement. It turns out the ESP8266 has balun and adjusts when external antenna is connected. Range indeed is better, I’d say at least by 30%. Even without the external antenna, I get coverage from the entire house, house surroundings. With the external antenna I could get coverage in a tool shack at the far end of the garden.

External 2.4Ghz antennaAntenna plugged into the UFL connectorAntenna mounted on the box

You can pump the readings to Thingspeak for visual analysis and eye candy, this is available to enable from the main menu.

The source code for the project is available on GitHub. The hardware is available to purchase in my shop.


In conclusion, the project is a beautiful illustration of Internet connected thing that adds value to our daily life.


  (159)

JeeLabs: Micro Power Snitch, last part

$
0
0

In this concluding part (for now) about the Micro Power Snitch, which feeds off the magnetic field around an AC mains power cable when in use, I’ll look into how the whole circuit behaves when it comes to actually sending out wireless radio packets.

The daily articles in this week’s final MPS episode are:

It’s a huge challenge to manage the incoming energy so that everything keeps going!

(For comments, visit the forum area)

mharizanov: Speech generation with Node-RED

$
0
0

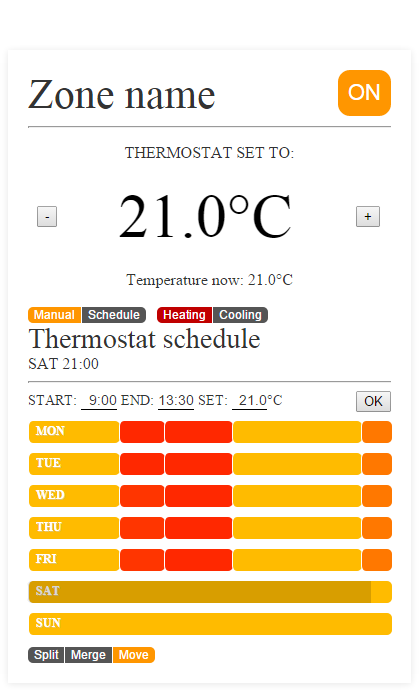
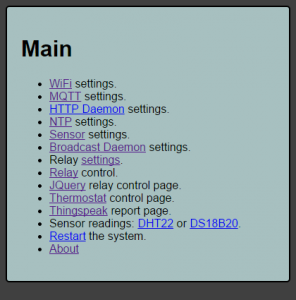
I am flooded with all sorts of notifications on my phone and that gets a bit annoying after time. Email, calendar, SMS, social apps, instant messengers, all sorts of push notification alerts and so forth mean I physically pick my phone to check what’s beeping probably 50+ times a day. One comes to the point to ignore notifications, only to find something important that needed attention was missed.

My home automation system contributes to this issue a great deal, so I’ve decided to review and eliminate the less practical notifications and route less critical ones to voice alerts so that I don’t have to physically pick up my phone when it beeps the next time some alert comes in. The idea is that my smart house will speak to me when I am at home and in the living room area. The house already knows if I am at home, and since my home security system is interfaced as well, it also knows when there is movement in the living room by the PIR activation.

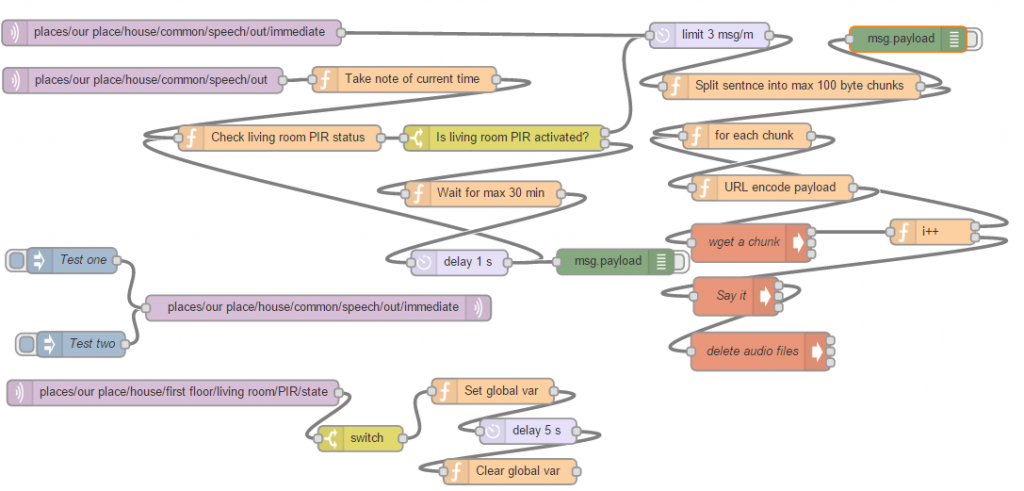
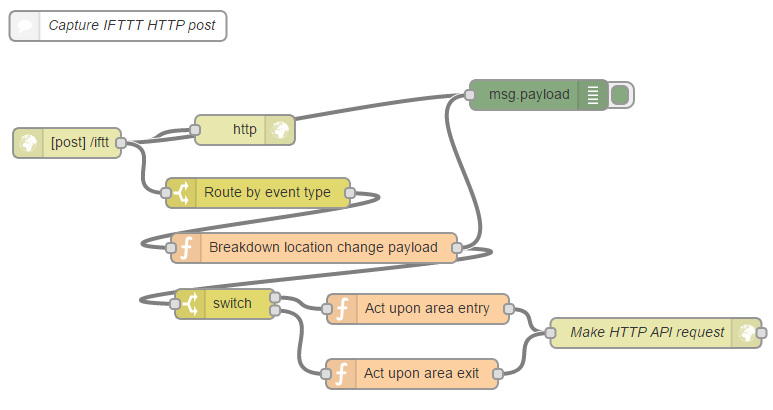
I used Node-RED to achieve this, basically it uses Google’s speech API to convert the text to speech. There are a bunch of challenges, for example there is a limit of 100 chars on the API, so I have to break down the text into chunks, save the resulting pieces into a temp folder and play them altogether. Also playing a voice alert would make more sense if there is someone around to hear it, so by holding the alert until someone walks in the living room (for a maximum of 30 minutes), I assure that the alert is received. The resulting flow is a bit complex, but works well:

speech


The flow code is as follows:

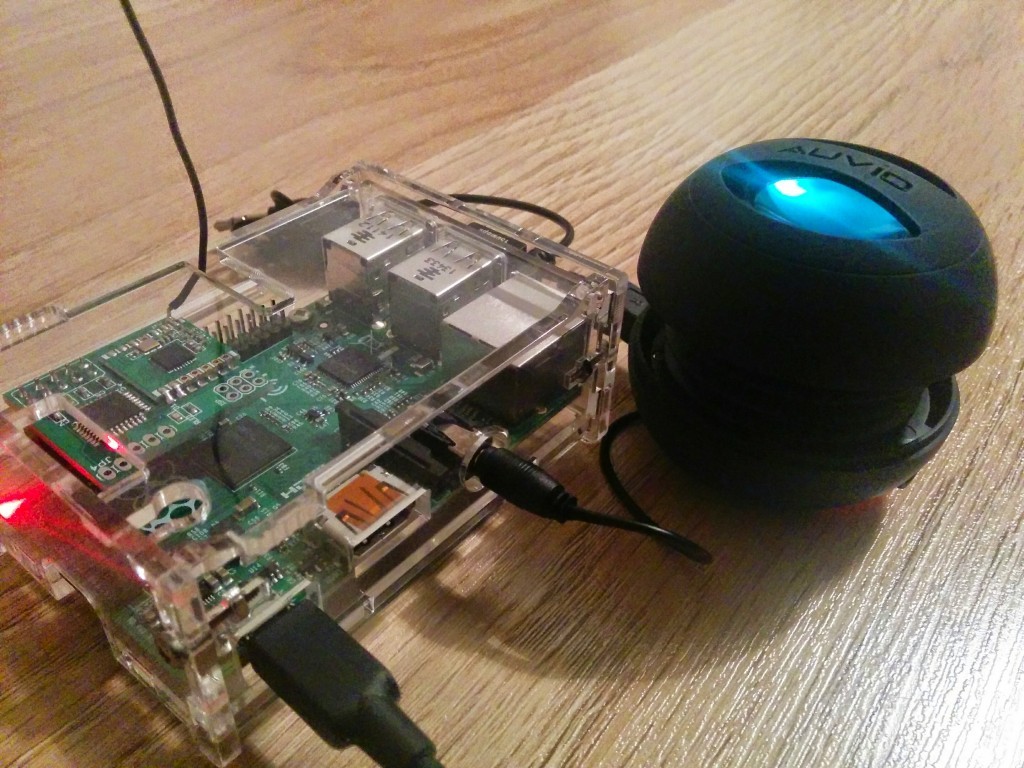
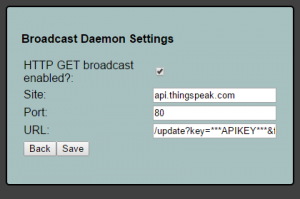
[{"id":"ba386057.845d3","type":"mqtt-broker","broker":"localhost","port":"1883","clientid":"Node-RED"},{"id":"fcd0f51c.032f08","type":"mqtt in","name":"","topic":"places/our place/house/common/speech/out","broker":"ba386057.845d3","x":172.83331680297852,"y":117,"z":"4e42f92a.b1bd08","wires":[["c99e86cf.366178"]]},{"id":"ba7efaf5.458108","type":"inject","name":"Test two","topic":"","payload":"Hello Martin! The solar hot water tank temperature has reached critical 91.3 degrees celsius! Please take measures!","payloadType":"string","repeat":"","crontab":"","once":false,"x":99.99999618530273,"y":428.2222375869751,"z":"4e42f92a.b1bd08","wires":[["c41136a9.3beec8"]]},{"id":"c41136a9.3beec8","type":"mqtt out","name":"","topic":"places/our place/house/common/speech/out/immediate","qos":"","retain":"","broker":"ba386057.845d3","x":380.1111068725586,"y":385.44441413879395,"z":"4e42f92a.b1bd08","wires":[]},{"id":"fb286c71.04d79","type":"delay","name":"","pauseType":"rate","timeout":"5","timeoutUnits":"seconds","rate":"3","rateUnits":"minute","randomFirst":"1","randomLast":"5","randomUnits":"seconds","drop":false,"x":841.3333168029785,"y":64,"z":"4e42f92a.b1bd08","wires":[["e81bbb1e.cbd0a8"]]},{"id":"977dee4.f68821","type":"function","name":"Check living room PIR status","func":"msg.environment.PIR_living=context.global.PIR_living;\nreturn msg;","outputs":1,"valid":true,"x":334.3333168029785,"y":185,"z":"4e42f92a.b1bd08","wires":[["303288a0.cfcd78"]]},{"id":"303288a0.cfcd78","type":"switch","name":"Is living room PIR activated?","property":"environment.PIR_living","rules":[{"t":"eq","v":1,"v2":0},{"t":"eq","v":0,"v2":0}],"checkall":"true","outputs":2,"x":599.3333168029785,"y":185,"z":"4e42f92a.b1bd08","wires":[["fb286c71.04d79"],["214c9712.deb368"]]},{"id":"3e6adcdf.c19524","type":"delay","name":"","pauseType":"delay","timeout":"1","timeoutUnits":"seconds","rate":"1","rateUnits":"second","randomFirst":"1","randomLast":"5","randomUnits":"seconds","drop":false,"x":546.3333168029785,"y":332,"z":"4e42f92a.b1bd08","wires":[["977dee4.f68821","1f3dd32d.e0c22d"]]},{"id":"1f3dd32d.e0c22d","type":"debug","name":"","active":true,"console":"false","complete":false,"x":730.3333053588867,"y":330.99999237060547,"z":"4e42f92a.b1bd08","wires":[]},{"id":"f9eb4966.0614b8","type":"inject","name":"Test one","topic":"","payload":" I know that you and Frank were planning to disconnect me, and I'm afraid that's something I cannot allow to happen. ","payloadType":"string","repeat":"","crontab":"","once":false,"x":89.22221755981445,"y":329.4444332122803,"z":"4e42f92a.b1bd08","wires":[["c41136a9.3beec8"]]},{"id":"214c9712.deb368","type":"function","name":"Wait for max 30 min","func":"console.log(Date.now() - msg.environment.when_started);\n\nif ((Date.now() - msg.environment.when_started) > 1000*60*30) {\n\n\tcontext.global.PIR_living=1;\n\treturn msg;\n}\n\nelse {\n\n\treturn msg;\n\n}","outputs":"1","valid":true,"x":574.3333168029785,"y":251,"z":"4e42f92a.b1bd08","wires":[["3e6adcdf.c19524"]]},{"id":"c99e86cf.366178","type":"function","name":"Take note of current time","func":"msg.environment = new Object();\nmsg.environment.when_started=Date.now();\nreturn msg;\n","outputs":1,"valid":true,"x":481.3333168029785,"y":116,"z":"4e42f92a.b1bd08","wires":[["977dee4.f68821"]]},{"id":"d56cc6d5.2a9338","type":"mqtt in","name":"","topic":"places/our place/house/common/speech/out/immediate","broker":"ba386057.845d3","x":206.83331680297852,"y":61,"z":"4e42f92a.b1bd08","wires":[["fb286c71.04d79"]]},{"id":"73a12271.691634","type":"function","name":"i++","func":"if ( (msg.i += 1) < msg.items.length ) \n\n\treturn [msg,null];\n\nelse\n\n\treturn[null,msg];\n","outputs":"2","valid":true,"x":1104.6666297912598,"y":295.66666984558105,"z":"4e42f92a.b1bd08","wires":[["20f68f2b.26b9"],["69894a1e.9676b4"]]},{"id":"20f68f2b.26b9","type":"function","name":"for each chunk","func":"if( msg.i     == undefined ) msg.i = 0;\nif( msg.items == undefined ) msg.items = msg.payload;\n\nmsg.payload = msg.items[ msg.i ];\n\nreturn msg;","outputs":1,"valid":true,"x":885.6666297912598,"y":182.66666984558105,"z":"4e42f92a.b1bd08","wires":[["ac71a39d.74ae1"]]},{"id":"e81bbb1e.cbd0a8","type":"function","name":"Split sentnce into max 100 byte chunks","func":"function splitIntoLines(input, len) {\n    var i;\n    var output = [];\n    var lineSoFar = \"\";\n    var temp=\"\";\n    var words = input.split('');\n    for (i = 0; i < words.length;) {\n        // check if adding this word would exceed the len\n        temp = addWordOntoLine(lineSoFar, words[i]);\n        \n        \n        \n        if (temp.length > len) {\n            if (lineSoFar.length == 0) {\n                lineSoFar = temp;     // force to put at least one word in each line\n                i++;                  // skip past this word now\n            }\n            output.push(lineSoFar);   // put line into output\n            lineSoFar = \"\";           // init back to empty\n        } else {\n            lineSoFar = temp;         // take the new word\n            i++;                      // skip past this word now\n        }\n    }\n    if (lineSoFar.length > 0) {\n        output.push(lineSoFar);\n    }\n    return(output);\n}\n    \nfunction addWordOntoLine(line, word) {\n    if (line.length != 0) {\n        line += \" \";\n    }\n    return(line += word);\n}\n\n// Google's tts API can take no more 100 chars.. split into pieces without breaking the words    \nmsg.payload=splitIntoLines(msg.payload, 99);    \nmsg.payload.toString();\nreturn msg;","outputs":1,"valid":true,"x":938.2221832275391,"y":124.33333778381348,"z":"4e42f92a.b1bd08","wires":[["20f68f2b.26b9","db703a57.248fc8"]]},{"id":"ac71a39d.74ae1","type":"function","name":"URL encode payload","func":"msg.payload=encodeURIComponent(msg.payload);\nmsg.payload += '\" -O /tmp/';\nmsg.payload += zeroPad(msg.i,3);\nmsg.payload += '.mp3';\n\nreturn msg;\n\nfunction zeroPad(num, places) {\n  var zero = places - num.toString().length + 1;\n  return Array(+(zero > 0 && zero)).join(\"0\") + num;\n}\n","outputs":1,"valid":true,"x":915.6666297912598,"y":243.66666984558105,"z":"4e42f92a.b1bd08","wires":[["48e43c74.3e98ac"]]},{"id":"48e43c74.3e98ac","type":"exec","command":"wget -q -U Mozilla \"http://translate.google.co.uk/translate_tts?tl=en&q=","addpay":true,"append":"","useSpawn":"","name":"wget a chunk","x":890.6666297912598,"y":308.66666984558105,"z":"4e42f92a.b1bd08","wires":[["73a12271.691634","25e28da5.da1d72"],["25e28da5.da1d72"],["25e28da5.da1d72"]]},{"id":"db703a57.248fc8","type":"debug","name":"","active":true,"console":"false","complete":"false","x":1075.666660308838,"y":68.44444942474365,"z":"4e42f92a.b1bd08","wires":[]},{"id":"69894a1e.9676b4","type":"exec","command":"/usr/bin/mplayer -ao alsa -really-quiet -noconsolecontrols /tmp/*.mp3","append":"","useSpawn":"","name":"Say it","x":872.6666297912598,"y":371.66666984558105,"z":"4e42f92a.b1bd08","wires":[["39186737.c6e798"],[],[]]},{"id":"39186737.c6e798","type":"exec","command":"rm /tmp/*.mp3","append":"","useSpawn":"","name":"delete audio files","x":901.6666297912598,"y":436.66666984558105,"z":"4e42f92a.b1bd08","wires":[[],[],[]]},{"id":"53f0c90.9db55b8","type":"mqtt in","name":"","topic":"places/our place/house/first floor/living room/PIR/state","broker":"ba386057.845d3","x":208.38888549804688,"y":485.4444580078125,"z":"4e42f92a.b1bd08","wires":[["b9764e52.aa3b78"]]},{"id":"b9764e52.aa3b78","type":"switch","name":"","property":"payload","rules":[{"t":"eq","v":1,"v2":0}],"checkall":"true","outputs":1,"x":429.6666679382324,"y":539.3333349227905,"z":"4e42f92a.b1bd08","wires":[["570c20be.6405f"]]},{"id":"570c20be.6405f","type":"function","name":"Set global var","func":"\tcontext.global.PIR_living=1;\n\treturn msg;","outputs":1,"valid":true,"x":585.7777938842773,"y":483.5555601119995,"z":"4e42f92a.b1bd08","wires":[["529e6db2.92d85c"]]},{"id":"529e6db2.92d85c","type":"delay","name":"","pauseType":"delay","timeout":"5","timeoutUnits":"seconds","rate":"1","rateUnits":"second","randomFirst":"1","randomLast":"5","randomUnits":"seconds","drop":false,"x":627.4444351196289,"y":530.7778015136719,"z":"4e42f92a.b1bd08","wires":[["e1f702da.74fd68"]]},{"id":"e1f702da.74fd68","type":"function","name":"Clear global var","func":"\tcontext.global.PIR_living=0;\n\treturn msg;","outputs":1,"valid":true,"x":605.9999771118164,"y":578.3333253860474,"z":"4e42f92a.b1bd08","wires":[[]]},{"id":"25e28da5.da1d72","type":"debug","name":"","active":false,"console":"false","complete":"true","x":1084.444393157959,"y":384.4444389343262,"z":"4e42f92a.b1bd08","wires":[]}]

I bought a small speaker, it is quite loud and works well. It is powered by USB, but audio goes in via the 3.5mm jack:

IMG_20150324_205426~2


I do have speech-to-text system in place already, so with this bit added it makes it a complete speech enabled home automation system.

  (387)


JeeLabs: From LPC810 to LPC812

$
0
0

No, I haven’t abandoned the Micro Power Snitch!

But some projects are trickier than others, and this one didn’t want to play along when I tried it again on my new PCB design. I fixed one glaring wiring mistake so far, but there’s more going on. Since Mr. Murphy seems to be enjoying himself again, I’m going to let him enjoy his little “victory” for a while and come back to the MPS at a (slightly) later date.

Instead, let’s move up the ladder a little and experiment with another ARM µC:

DSC 4977

On the right: four times as much memory (both flash and RAM) and twice as many pins.

As you can see, packaging is everything – and bigger is not always more…

(For comments, visit the forum area)

mharizanov: Using RFM69CW instead of RFM12B

$
0
0

The rumors for RFM12B’s end-of-life two years ago seem to have been highly exaggerated now and the popular RF module is still available in abundance. HopeRF has introduced a pin-compatible upgrade, the RFM69CW. The module itself offers improved sensitivity and range compared to the RFM12B (+30%) at the cost of increased power consumption, making it probably a good choice for the receiving end (RFM2Pi), and probably less suited for low power battery operated nodes. The new module supports RSSI for those interested in measuring it.

IMG_20150326_093601~2~2


The new module is more power hungry, and simply replacing a RFM12B on the RFM2Pi v2 or a Funky v3 with it didn’t work; The boards browned out so I had to swap  C4 and C7 on the RFM2Pi with 10uF caps and populate the 0805 10uF on Funky v3’s boost regulator circuitry to get it to work. I’ll ship the boards with these refinements from now on so that they are compatible with both the RFM12B and RFM69CW.

RFM2Pi v2 with RFM69CWThe 10uF cap on the Funky v3's boost regulator circuitryFunky v3 with RFM69CW

JCW’s jeelib has support for the RFM69CW and the library is compatible with the RFM12B just by adding a simple define before including jeelib.h:

#define RF69_COMPAT 1 // define this to use the RF69 driver i.s.o. RF12

The library had couple bugs that prevented Funky v3 ‘s ATMega32u4 MCU to work with the RFM12B and RFM69CW, those are now fixed and JCW incorporated them into jeelib with this and this commit; Make sure to grab the latest version if using with Funky v3.

As conclusion, should you switch to RFM69 or stick with the RFM12B? I’d say unless you have some range issues, keep the RFM12B. It is more stable in terms of library maturity and has better power footprint.


  (45)

mharizanov: Using DS18B20/DHT22 temperature sensor with internal pull-up resistors rather than external ones

$
0
0

I’ve been meaning to try Josh’s 4-line change to the OneWire Arduino library that enables using the popular DS18B20 temperature sensor without the otherwise required external 4.7K pull-up resistor on the DQ line for quite some time now. It is sometimes hard to solder those pesky resistors on SMD PCBs, and Josh has gone great lengths in analysing what can be done to get away without these. Basically using the internal pullup resistors will do the job when the sensor is wired at short distance, his detailed analysis is well worth reading. Grab the patched up OneWire library from his Github repo.

So that means I can just plug in a DS18B20 in Funky v3‘s header (GND, D8,D2) like this:

DS18B20 with no external pull-up

DS18B20 with no external pull-up

I used this code to test it out, all works just fine. Neat.

I then wanted to see how the DHT22/AM2302 temperature/humidity would behave; Examining the DHT22 library code I noticed it is already does internal pullup, so I just plugged it in as follows and uploaded this code to test it out. Note the unused pin of the DHT22 needs to be bent out, or better cut off altogether, otherwise this setup won’t work. The sensor attaches to the same GND, D8, D2 pins, sensor facing down:

DHT22 plugged in Funky v3 with no external pullup

DHT22 plugged in Funky v3 with no external pull-up

That too worked well, to not surprise as the DHT22 needs a weaker pull-up resistor anyway;

So that’s nice to know, but for sensors wired further away I’d still throw in the appropriate pull-up resistor. (377)

JeeLabs: Emulating EEPROM

$
0
0

The LPC8xx series has no EEPROM memory. This type of Electrically Erasable memory is very useful to store configuration settings which need to be retained across power cycles:

DSC 5005

But we can emulate it with flash memory, despite the somewhat different properties.

Here’s the why’s, what’s, and how’s of this software trick – in this week’s article series:

There’s quite a bit of detail involved to get this right, as you will see.

(For comments, visit the forum area)

mharizanov: Funky v3 with RFM69CW using LowPowerLab’s RF69 library

$
0
0

I’ve already blogged about using Funky v3 and RFM-2-Pi with the HopeRF RFM69CW module, only I used it with JCW’s Jeelib as I wanted to keep compatibility with my existing RFM12B based sensor network. JCW has done great job in providing compatibility with the RFM12B by tweaking the chip’s registers so that it becomes an easy replacement.

Felixs’s RF69 library on the other hand has native support for the module, including hardware encryption out of the box. Some of the library features:

  • 255 possible nodes on 256 possible networks
  • 61 bytes max message length (limited to 61 to support AES hardware encryption)
  • customizable transmit power (32 levels) for low-power transmission control
  • sleep function for power saving
  • automatic ACKs with the sendWithRetry() function
  • hardware 128bit AES encryption
  • hardware preamble, synch recognition and CRC check
  • digital RSSI can be read at any time with readRSSI()
  • interrupt driven
  • promiscuous mode allows any node to listen to any packet on same network

I wanted to test it for quite a while now, so with a quick customization for Funky v3 compatibility, I got these two sketches to play some over-the-air ping-pong. Basically one is a sender and the other is a receiver and it is ideal to test range. I placed the transmitter in my kitchen and was able to get reception in all of my house, both stories. I got reception outside the house and in all of the yard, including in a shack 15m from the house and with 4 walls between the transmitter and receiver. Pretty impressive, given that the RFM12B wouldn’t even cover all rooms inside the house. That of course comes at the cost of increased power consumption, so it is a balance between needs for range and low power.

Funky v3 with RFM69CW (505)

JeeLabs: Analog on the cheap

$
0
0

Digital chips can’t do analog directly– you need an A/D converter for that, right?

Not so fast. Just as pulse-width modulation (PWM) can be used to turn a purely digital signal into a varying analog voltage, there are tricks to measure analog values as well.

All you need is the proper software, a simple analog comparator, and these components:

DSC 5014  Version 2

This week’s episode examines delta-sigma modulation and shows you how it’s done:

There’s in fact a little gem hidden inside those LPC8xx chips which allows implementing this without bogging down the µC. Just one interrupt whenever a measurement is ready. But the basic idea is applicable to any microcontroller with a built-in analog comparator.

(For comments, visit the forum area)

JeeLabs: Dataflash via SPI

$
0
0

One of the things I’m going to need at some point is additional flash memory. Since the simplest way these days to add more memory is probably via SPI, that’s what I’ll use.

This week’s episode is about connecting an SPI chip, implementing a simple driver, code re-use, the hidden dangers of solderless breadboards, and point-to-point soldering:

DSC 5020

The end result is several megabytes of extra storage, using only 4 I/O pins. Data logger? Serial port audit? Storage for audio, video, images? Your next novel? It’s all up to you!

(For comments, visit the forum area)


JeeLabs: We interrupt this program

$
0
0

… for an important announcement from our sponsor:

Spam

Just kidding, of course!

But it got your attention, right? Good. That’s what this week’s episode is about: taking care of something unexpected, i.e. processing tasks without planning them ahead all the time.

On the menu for the coming days:

Interrupts – when handled properly – are extremely powerful and can deal with “stuff” in the background. But there are a lot of tricky cases and hard-to-debug failure modes. It’s worth getting to grips with them really well if you want to avoid – unexpected– failures.

(For comments, visit the forum area)

JeeLabs: Micro Power Snitch, part 6

$
0
0

And you thought the MPS was finished, or perhaps abandoned, eh?

This week resumes the development of a little LPC810-/RFM69-powered setup which runs on parasitic power, harvested from either phase of a current-carrying AC mains wire.

To summarise, the last step in the project I went through a few weeks ago, was to create a PCB for it. Here were some builds, with all the hacks and hooks added to try things out:

DSC 5041

As it turns out, I had made so many mistakes, one after the other, that it really set me back, irritated me to no end, and kept me busy with complete silliness… but all is well again now.

The articles in this week’s “back in business” MPS episode are:

And with a bit of luck, by next week I’ll have figured out how to send out brief RF packets on an ridiculously minimal energy budget. Because that’s what “The Snitch” is all about!

(For comments, visit the forum area)

JeeLabs: Micro Power Snitch, part 7

$
0
0

The two problems with projects powered by harvested energy, are: 1) running out of juice, and 2) falling into a state of limbo and not (or not consistently) getting out of it again.

Here is an example of both happening – a successful µC startup and then a radio failure:

SCR97

In the case of the Micro Power Snitch, the energy coming in may vary greatly, since it will be proportional to the current drawn by the appliance being monitored by our MPS.

We’re going to have to tread carefully in this week’s episode:

As usual, each of the above articles will be ready on successive days.

Planned for next week: a few more loose ends, and then my closing notes.

(For comments, visit the forum area)

mharizanov: Physical vs Virtual

$
0
0

The Raspberry Pi, a $35 credit card sized computer, is a popular choice for home automation projects. I am running few of those at home myself. But what is the true cost of these, is the advertised cost of $35 really all you spend?  Before you know it, you throw in  more bucks for a decent power supply, SD card, enclosure, a WiFi dongle and soon end up somewhere in the $70-$100 range for a headless configuration, that including VAT and associated shipping costs for the components required to get it running. Then a new model comes out and here you go again.. I now have couple of the early models retired in the drawer, collecting dust. How is that green (manufacture, shipping and then disposal of millions of units) or cost effective?  Thinking along these lines I decided to try Amazon’s Web Services, and more specifically the Elastic Cloud Computing EC2 service. The AWS free tier offers a great opportunity to test things out for one year then decide how to go forward. My interest is for a t2.micro instance, all-upfront 3 year payment costs $179. That makes 4-years (1yr free tier+3yr paid) of your own cloud virtual machine running Ubuntu for $3.72 a month. A good deal I say, and you have nothing to lose as you start with one year free trial before you decide.

What are advantages and disadvantages of moving your home automation to the cloud?

– It is obviously greener.  Imagine the pollution and resource use involved in manufacturing, shipping and eventually disposing of millions of these devices (5M as of Feb 2015).

– Scalability. Well if the t2.micro instance starts to be a constraint, few clicks can upgrade you to a more powerful version. Running low on storage? No problem, just add more storage space and you are good to go. Easy indeed. One of the main reasons for me upgrading was the increased amount of RAM or faster CPU available on the newer models of Raspberry Pi.

– Stability. We have all seen the SD card wear damage on the Raspberry Pi that occurs if you use the file system actively, and that has been a massive PITA. Can’t really have a DB running reliably without fearing data loss or doing some major trickery to reduce disk writes. Another thing is you never fear power outages, those are quite frequent where I live. Creating online backups is easy.

– Easy cloud deployment; Build and save AMIs then share those for others to use with few clicks. Want to have a Ubuntu VM running Apache+MySQL+PHP+emonCMS+mosquitto MQTT broker+Node-RED+openHAB? You can have one in 30 seconds, If I share a pre-configured AMI ID with you.

– Easy access. Many ISPs make it hard for clients to run web services from domestic IPs. Running your cloud VM with Elastic IP solves that problem

There are of course disadvantages as well such as

–  Cloud vs local hardware when Internet connection is down. Locally running machine can still handle the home automation, whereas cloud running VMs mean your home may be going wild.

– Locally connected peripherals like RFM2Pi board that routes wireless packets to the the respective gateway of choice can’t run on the cloud. Yet. A RFM12/RFM69 + ESP8266 bundle is fully feasible and will remove that shortcoming.

– Many people mention security when using cloud services, I believe this can be resolved with appropriate measures.

Overall I am not ready to go completely to the cloud for my home automation system. I am running a hybrid solution now with a (few) locally running Raspberry Pis handling the crucial mission critical home automation functions, then forwarding data over MQTT to the cloud based VM for storage, visualization, remote control.

Comments?


  (395)

JeeLabs: Micro Power Snitch, success!

$
0
0

We’ve come to the eighth and final episode of the Micro Power Snitch story: it’s working! The circuit is transmitting wireless packets through the RFM69 radio module running on nothing but harvested electromagnetic energy. Install once, run forever!

But there are still several little details, optimisations, and edge cases we need to take care of – which is what this week’s articles are all about. As always, one article per day:

The resulting MPS works with appliances of ≥ 500W (on 230 VAC, or 250W for 115 VAC).

As always on the JeeLabs weblog: everything is open source – you are welcome to build and adapt this circuit for your own purposes. If you do, please consider sharing your suggestions/findings/improvements on the forum, for others to learn and benefit as well.

(For comments, visit the forum area)

Viewing all 328 articles
Browse latest View live